Clipper firmware
What exactly is firmware? Simply put, software that is used to control a specific embedded system. In our case, to control the board in a 3D printer. The most well-known and commonly used firmware in hobby 3D printers is Marlin firmware.
Klipper
It's also firmware for 3D printers, but it works a little differently than Marlin.
This is because Klipper combines the computing power of most often the Raspberry Pi and one or more 3D printer microcontrollers. This is probably his most characteristic hallmark. Thanks to this solution, it is possible to move even an 8-bit board from a 3D printer to a much higher performance. The calculation of the movement of the 3D printer is taken over by Klipper, and the board in the printer is only the executor of commands from Klipper.
Another interesting feature of Klipper is that it can connect and use several different boards at the same time. For example, the Voron 2.4 3D printer has 7 motors (the Z axis is on 4 independently controlled motors). A standard 3D printer board usually has 4 - 5 drivers (stepper motor drivers), so you can connect 4 - 5 independently controlled motors. Thanks to Klipper, you can connect two of these boards at the same time, and for example, on one board you have 4 drivers for the Z axis, and on the other board, you have the remaining drivers and everything else for printer operation (limit switches, thermistors, heaters, etc.). The Raspberry Pi itself can also serve as an external board, making it possible to extend a simple board with additional control logic and input management provided by the Raspberry.
Klipper also has a simple configuration. That was a very strong motivation for me personally to try Klipper. All printer settings are handled in the printer.cfg configuration file. Any change to the printer settings is done by simply editing the text file, and then restarting the service firmware on Raspberry. Marlin, on the other hand, always has to compile and upload brand-new firmware to the printer board. You can save a lot of time by tuning your printer or adding a sensor to calibrate the pad, for example. It is also possible to have several subconfiguration files, for example, a separate file for macros, a separate file for the leveling sensor, and so on, and then insert them into the printer.cfg using the Include command. The settings are then more clear.
Smooth Pressure Advance - another of Klipper's interesting features. It's similar to the Linear Advance we know from Marlin Firmware. This mechanism takes into account the effects of the pressure that arises behind the extruder. This reduces unwanted filament leakage from the nozzle and improves print quality at the corners.
Input Shaping - a mechanism to reduce the impact of vibration on print quality. Probably everyone has encountered "ghosts" on the printout. Thanks to this functionality, you can significantly reduce them while achieving higher print speeds while maintaining high print quality.
With both of these features, Klipper has nicely crafted manuals, so it's not too difficult to tune your printer this way. For Input Shaping, it can even use an accelerometer for a few crowns, and make the whole tuning much easier. Even though you will find heaps of videos on these topics on youtube.
Macros - Macros can be defined in the printer configuration file. These commands are programmable, allowing them to perform various actions depending on the state of the printer. You can create your sequences of G-code commands, for example, to change the filament, change the color of the printer's lighting depending on the hot-end temperature, and other tweaks. Examples of the use of macros can be found here.
Klipper can do much, much more. You can read more in Klipper / features.
MainsailOs, Fluidd or Octoprint
Octoprint is already familiar with most 3D printers. It is used to control the printer via a web browser and transfer the gcode for printing - no more recording to the SD card. Like the Klipper, it requires a Raspberry Pi to run. If you already use Octoprint, I recommend that you start thinking about trying Klipper as well. Klipper can also run on the same Raspberry with Octoprint. However, I don't want to talk about Octoprint.
There are other ways to control the printer via a web browser. The most popular in the Klipper community are MainsailOs and Fluidd. Thanks to the pre-prepared image for the Raspberry Pi, you can have a functional web interface with Klipper in a matter of seconds, and you can start connecting the board and then playing with the printer.
Both MainsailOs and Fluidd are designed to work with Klipper and provide a fast and responsive interface for working with the printer. Thanks to this, you can easily not only control the printer via a computer, tablet, or mobile phone, but also observe it with a camera, or tune and adjust settings in configuration files.
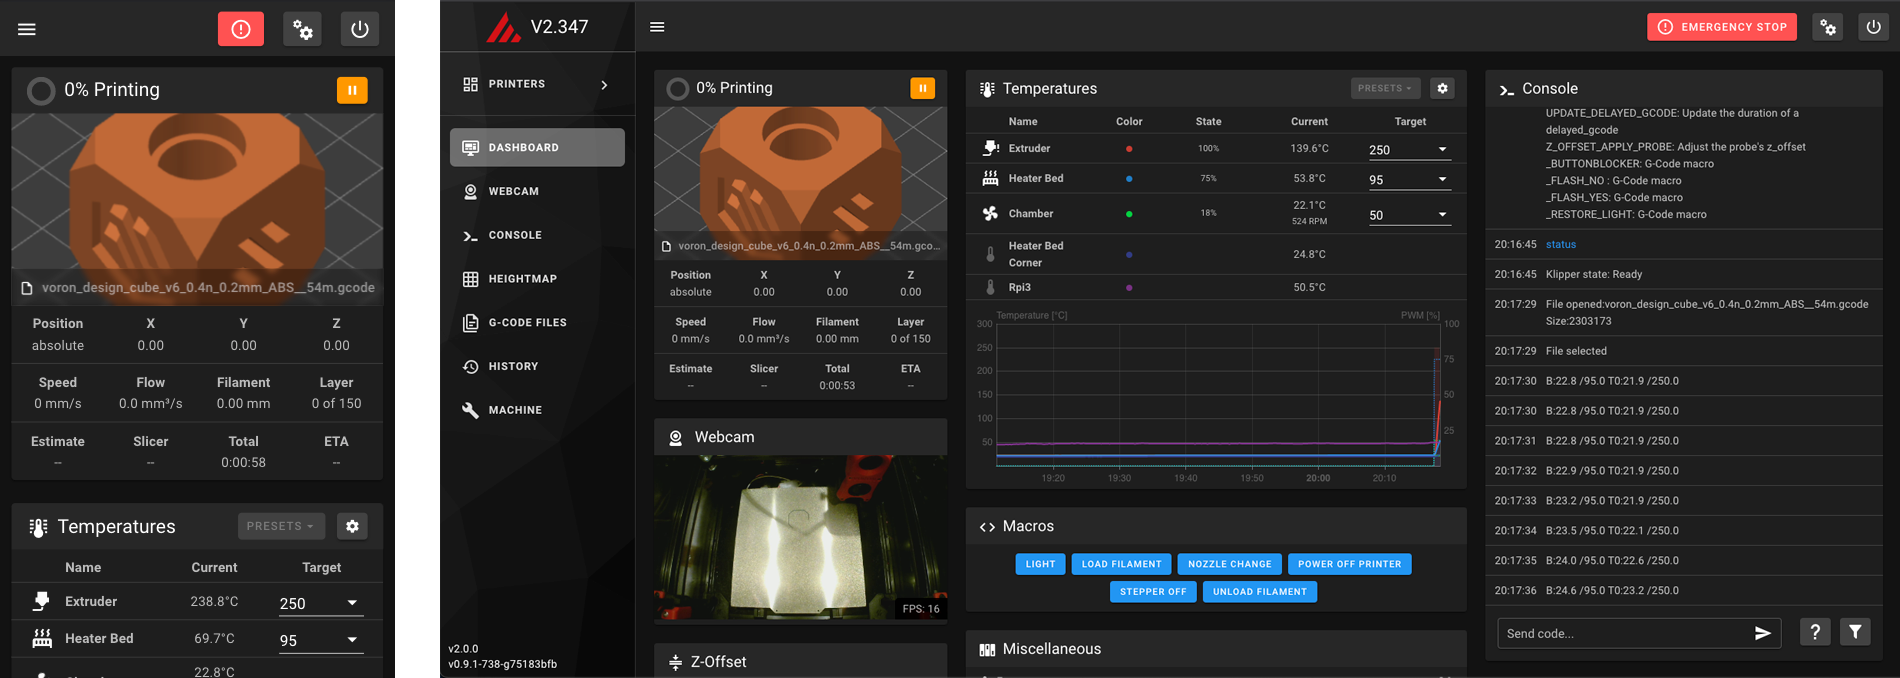
Example of MainsailOs interface both on mobile and computer:
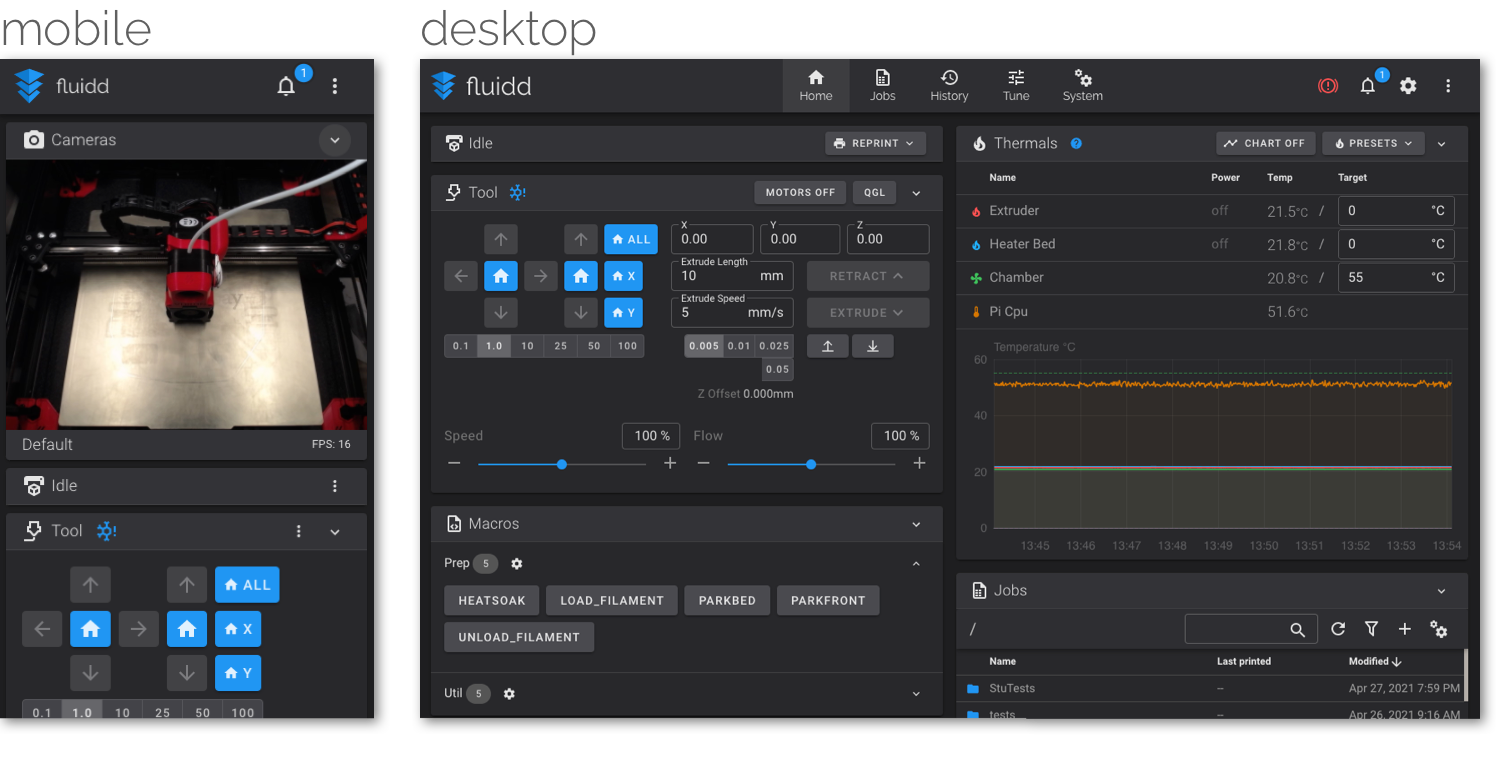
Example of Fluidd interface:
As you can see, both are quite similar, but each solution has different tweaks, so I recommend trying both MainsailOs and Fluidd and then choosing. In my opinion, this is a better choice than the aforementioned Octoprint, because it is not so hardware intensive, and Klipper with any of these interfaces can easily run on the Raspberry Pi Zero W. Here's a little warning. If you want to have a camera on the printer (as you can see in the pictures), the Rpi Zero W will no longer chase after the performance, so you need to look for another Raspberry, such as the Raspberry Pi Zero 2 W.
Disadvantages
In my opinion, the main disadvantage is the need for another device, the Raspberry Pi, which must run with the printer. Which also means raspberry power. Thanks to a lighter interface, Klipper in combination with Fluidd or MainsailOs can also do the Raspberry Pi Zero W for about three or four hundred. In addition, this small Raspberry can be powered directly from the printer board and 4 cables will be enough for the entire connection. For the more powerful Raspberries, you will need an external power supply. A separate power supply can also be an advantage. The printer may be turned off, but you still have the option to upload files or configure the printer. On the other hand, if you have multiple printers with an old 8-bit board or with drivers in legacy mode, one RPI can save you money on upgrading all boards.
Another disadvantage may be the more complicated initial "shaking" of the board in the printer. I don't think it would be more difficult than starting with Marlin from scratch. If you can compile Marlin and upload it to the printer, you can certainly compile the firmware for your board and upload it to the printer. Plus, you only do it once and can easily configure the printer with Klipper.
Display support is not as wide as Marlins. Only basic displays are supported (eg Creality 12864, MKS Mini 12864, Fysetc Mini 12864). Before installing Klipper, it's a good idea to see if your display is supported. If not, you don't have to be sad, you can run Klipper without a display and control the printer from your mobile phone. After all, it's a more pleasant way to control the printer.
Moving some things like M600 support for filament replacement and other similar things. However, it must be said that these things are addressed by the macros mentioned above.
Klipper is not as widespread and known as Marlin, so there is generally less information and instructions on the Internet. But I must say that I have always found a solution to every problem. In addition, Klipper dominates among the leading open-source printers (Voron, etc.) and is thus under constant pressure to improve and expand. And thanks to that, the community of his fans is growing fast.
In conclusion
This article is not a Klipper installation guide, nor is MainsailOS or Fluidd. My goal is to introduce you to Klipper as a great alternative. You will find a video on youtube for every event, so it will not be a problem to start testing. As I wrote above, if you can compile Marlin, you can move Klipper.
Links
And I'm attaching a video from Nero3D (in English).
https://www.youtube.com/watch?v=iNHta6zljoM
And don't forget - 3D printing is a joy!
Thanks to Tomáš and other people from Voron Discord for technical comments and help in writing the article.